minikube 只提供 signle-node Kubernetes Cluster,本身並不支援 HA (High availability) 因此不推薦實際應用上運行
Minikube 是 Kubernetes 輕量化的實作,會在本機的 VM 內建立並且執行一個單一節點的 Kubernetes Cluster。
本機端操作,只有一個 Node 就是 minikube
(目前 docker 有支援 Kubernetes,可以直接使用)
安裝 virtualbox
minikube 會在本機端跑起一個 vm,因此要先安裝 virtualbox
1
brew cask install virtualbox
安裝 kuberctl (Kubernetes command-line tool)
可以透過此工具來部署管理 Kubernetes Install and Set Up kubectl
1
2
# kubectl
brew install kubernetes - cli
也可以透過 curl 來安裝 kubectl 的 binary 執行檔
1
2
3
4
5
6
7
8
# 下載套件( for MacOS )
curl - LO https : //s torage . googleapis . com / kubernetes - release / release / $ ( curl - s https : //s torage . googleapis . com / kubernetes - release / release / stable . txt ) / bin / darwin / amd64 / kubectl
# 給予執行權限
chmod + x . /kubectl
# 將kubectl移到PATH下
sudo mv . /kubectl /usr/ local / bin / kubectl
安裝 minikube
minikube
1
brew cask install minikube
啟動 minkkube
第一次啟動會自動建立下載映像檔來建立 VM 所以會比較久
1
2
3
4
5
6
7
8
9
10
11
12
13
14
15
16
17
# 啟用 minkkube 叢集
minikube start

# 停用 minkkube 叢集
minikube stop

# 查看狀態
minikube status

# 啟用 GUI dashboard
minikube dashboard

where minikube
# /usr/local/bin/minikube

minikube version
# minikube version: v0.32.0
啟動 minikube 之後,HOME 目錄會多一個 .kube 的資料夾,而 kubectl 就是透過該資料夾底下的 configuration 與 minikube 溝通
1
2
3
4
5
6
7
8
9
10
11
12
13
14
15
16
17
18
19
20
21
cat ~ /.kube/ config
apiVersion : v1
clusters :
- cluster :
certificate - authority : /Users/ [ username ]/. minikube / ca . crt
server : https : // 192 . 168 . 99 . 100 : 8443
name : minikube
contexts :
- context :
cluster : minikube
user : minikube
name : minikube
current - context : minikube
kind : Config
preferences : {}
users :
- name : minikube
user :
client - certificate : /Users/ [ username ]/. minikube / client . crt
client - key : /Users/ [ username ]/. minikube / client . key
執行 hello-minikube
1
2
3
4
5
6
7
8
9
10
11
12
13
14
15
16
17
18
19
20
21
22
23
24
kubectl run hello - minikube -- image = gcr . io / google_containers / echoserver : 1 . 8 -- port = 8080
# deployment "hello-minikube" created
kubectl expose deployment hello - minikube -- type = NodePort
# service "hello-minikube" exposed
# 得到 server 的 url,每次產生的 url 是系統決定的
minikube service hello - minikube -- url
# http://192.168.99.100:32023
# 列出所有 services 資源
kubectl get services
# 顯示關於資源的詳細資料
kubectl describe services
# 從 Pod 列印日誌
kubectl logs
# 從 Pod 執行命令
kubectl exec
# 查看 cluster 狀態
kubectl cluster - info
run:建立一個 Deployment 或是 Job 來管理被建立的 Container--image:Image 的來源,這裡是用 gcp 提供的 image--port:指定埠號expose:讓存取 hello-minikube 服務可以被存取
執行自己的 container
啟動 Pod
--port: container 對應到 pod 的 port
1
2
3
4
# --image: 指定 docker images 位置和版本
# port: container 對外 port
kubectl run docker - golang - demo -- image = docker . io / mgleon08 / docker - golang - demo : v1 . 0 . 0 -- port 8080
# deployment.apps "docker-golang-demo" created
查看 node 裡面的 pod
1
2
3
4
# 可以查看 pods / services / deployments
kubectl get pod
# NAME                                 READY     STATUS    RESTARTS   AGE
# docker-golang-demo-d8c764787-fxs4v   1/1       Running   0          7m
expose service 讓外部訪問
default Pod 只允許 cluster 內部訪問,因此透過 expose 將 container 的 port 對應到 Node 的 port
expose: 把 deployment expose 成對外 service--type=NodePort: 把 Deployment 透過 Kubernetes Cluster 的 port 讓 Cluster 外部可以訪問
service 將 docker-golang-demo 的 8080 port 與 minikube 上的 31754 port 做 mapping
1
2
3
4
5
6
7
kubectl expose deployment / docker - golang - demo -- type = NodePort -- port 8080
# service "docker-golang-demo" exposed
# 隨機分發 port 31754
kubectl get services
# NAME TYPE CLUSTER-IP EXTERNAL-IP PORT(S) AGE
# docker-golang-demo NodePort 10.103.48.219 <none> 8080:31754/TCP 1m
取得外部 url
1
2
minikube service docker - golang - demo -- url
# http://192.168.99.100:31754
scale pod
1
2
3
4
5
6
7
8
9
10
11
12
13
14
15
16
17
18
19
20
21
22
23
# default 只有一個 一個副本 replication
kubectl get deployments
# NAME DESIRED CURRENT UP-TO-DATE AVAILABLE AGE
# docker-golang-demo 1 1 1 1 7m
# scale 3 個副本
kubectl scale deployments / docker - golang - demo -- replicas = 3
# deployment.extensions "docker-golang-demo" scaled
# deployment 設定變成 3 個
kubectl get deployment
# NAME DESIRED CURRENT UP-TO-DATE AVAILABLE AGE
# docker-golang-demo 3 3 3 3 31m
# 檢查副本
kubectl get replicasets
# 可以看到 pod scale 成 3 個
kubectl get pod
# NAME READY STATUS RESTARTS AGE
# docker-golang-demo-d8c764787-4shjd 1/1 Running 0 11s
# docker-golang-demo-d8c764787-fxs4v 1/1 Running 0 30m
# docker-golang-demo-d8c764787-v9lq6 1/1 Running 0 11s
Update Container
將 container update 成 v2 版本
1
kubectl set image deployments / docker - golang - demo docker - golang - demo = docker . io / mgleon08 / docker - golang - demo : v2 . 0 . 0
或是編輯 deployment 更改成 v2,儲存後會自動 update
1
kubectl edit deployment [ deploymentName ]
打開一樣的網址 http://192.168.99.100:31754 會發現頁面變成 v2 了
Rollout Container
將 container rollout 成 v1 版本
1
2
3
4
5
6
7
8
9
10
kubectl rollout undo deployments / docker - golang - demo
# check rollout 狀態
kubectl rollout status deployments / docker - golang - demo
# 萬一有問題可以暫停
kubectl rollout pause deployments / docker - golang - demo
# 歷史紀錄
kubectl rollout history deployments / docker - golang - demo
將服務刪除
1
2
3
4
5
6
# 只刪除 pod,會馬上自動在 create 新的
kubectl delete pod [ name ]
# 其他兩個還是會在
kubectl delete service [ name ]
# 刪除 deployment, service 還會留著
kubectl delete deployment [ name ]
透過 yaml 執行 pod
demo-pod.yaml
1
2
3
4
5
6
7
8
9
10
11
12
apiVersion : v1
kind : Pod
metadata :
name : demo - pod
labels :
app : webserver
spec :
containers :
- name : docker - golang - demo - pod
image : mgleon08 / docker - golang - demo : v1 . 0 . 0
ports :
- containerPort : 8080
apiVersion: Kubernetes 版本號kind:說明 Kubernetes Object 是什麼類別metadata
name: 指定 pod 的名稱labels: 透過 Label Selector 將Pod分群管理annotations : 相較於labels,annotations 通常是使用者任意自定義的附加資訊,提供外部進行查詢使用,像是版本號,發佈日期等等
spec
container.name: container 的名稱container.image: 根據 Docker Registry 提供的可下載路徑container.ports: 該 container 有哪些 port number 是允許外部資源存取
1
2
3
4
5
6
kubectl create - f demo - pod . yaml
# 或 kubectl apply -f demo-pod.yaml
kubectl pod
# 看更多資訊
kubectl describe pods my - pod
如何與 Pod 中的 container 互動
1
2
3
# port-forward 能將 pod 中的某個 port number,與本機端的 port 做 mapping
# 本機 3000 對應到 8080
kubectl port - forward demo - pod 3000 : 8080
Kubernetes Cluster 內部會有一套網路系統,會替每個 Pod 建立一個內部隨機產生的 Cluster IP。這個 Cluster IP 只有Cluster內部資源可以使用;外部資源是無法透過 Cluster IP 與 Pods 互動,所以我們需要再建立一個 Service 元件作為一個橋樑,讓 Cluster 以外的服務也可以與 Pod 做互動。
1
2
3
4
5
6
kubectl expose pod demo - pod -- type = NodePort -- name = demo - pod - service
kubectl get services
# 8080 對應到 minukube vm 的 31956 port
# NAME TYPE CLUSTER-IP EXTERNAL-IP PORT(S) AGE
# demo-pod-service NodePort 10.97.180.196 <none> 8080:31956/TCP 28s
取得 url
1
2
minikube service demo - pod - service -- url
# http://192.168.99.100:31956
使用 alpine 查看 cluster 狀況
alpine 提供非常輕量級的 Docker Image,藉由 Kubernetes Cluster 中,會給每個 Pod 一個 Cluster IP 且只有在 Cluster 裡才可以存取的特性,透過 alpine 來訪問其他 pod
1
2
3
4
5
6
7
8
# 先取得 IP 172.17.0.5
kubectl describe pod demo - pod
# 建立 alpine
kubectl run - i -- tty alpine -- image = alpine -- restart = Never -- sh
# 安裝 curl
apk add -- no - cache curl
# 發 request
curl http : // 172 . 17 . 0 . 5 : 8080
Pod 相關指令
1
2
3
4
5
6
7
8
9
10
11
12
13
14
15
16
17
18
19
20
21
22
23
24
25
26
# 取得目前所有的 pod
kubectl get pods
# 顯示全部的 pod
kubectl get pods -- show - all
# pod 詳細資料
kubectl describe pod < pod >
# 將 Pod 中指定的 port number expose 出來讓外部服務存取(建立一個新的 Service 物件)
kubectl expose pod < pod > -- port =< port > -- name =< service - name >
# 將 Pod 中指定的 port number mapping 到本機端的某一特定 port number
kubectl port - forward < pod > < external - port > : < pod - port >
# 進到 container 裡面
kubectl attach < pod > - i
# 對 pod 下指令
kubectl exec < pod > -- < command >
# 新增 Pod 的 Labels
kubectl label pods demo - pod version = latest
# 顯示所有 labels
kubectl get pods -- show - labels
Deployment
管理 containers 橫向擴展(Horizontal scaling),透過增加更多的機器節點,獲取更多資源
管理 Pod 的 replicas(副本) 和狀態維持在使用者所定義的副本數
Replication Controller 都有屬於自己的 yaml 檔
在Replication Controller設定檔中可以指定同時有多少個相同的 Pods
當 Pod 發生 crash, failed,而無法提供服務時,Replication Controller 會自動的砍掉無法正常執行的 Pod,並且重新建立一個新的 Pod 來維持 replicas 的數量
當機器重新開啟時,之前在機器上運行的 Replication Controller 會自動被建立,確保 pod 隨時都在運行。
ReplicaSet 和 Replication Controller 本質上是相同的,差別在於 ReplicaSet 支援集合式的 selector,而 Replication Controller 只支援等式的 selector
1
2
3
4
5
6
7
8
9
10
11
12
13
14
15
16
17
18
apiVersion : v1
kind : Deployment
metadata :
name : demo - pod - replication
spec :
replicas : 3
selector :
app : docker - golang - demo - pod
template :
metadata :
labels :
app : docker - golang - demo - pod
spec :
containers :
- name : docker - golang - demo - pod
image : mgleon08 / docker - golang - demo : v1 . 0 . 0
ports :
- containerPort : 8080
spec.replicas: pod 副本的數量spec.selector: 指定選擇 Pod 的條件(labels)spec.template: 定義pod的資訊,包含Pod的labels以及Pod中要運行的containerspec.template.metadata: Pod 的 labels,metadata.labels 必須被包含在select中,否則在建立Replication Controller物件時,會發生error。
Service
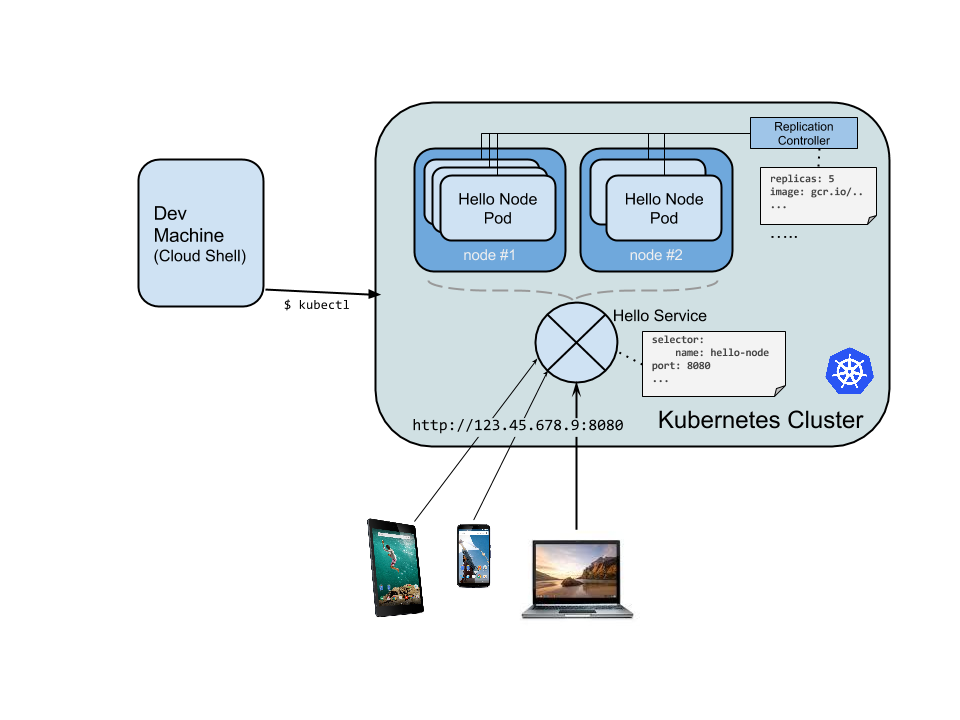
Hello Node Kubernetes Create your Node.js application
建立小型 server.js
server.js
1
2
3
4
5
6
7
var http = require ( ' http ' );
var handleRequest = function ( request , response ) {
response . writeHead ( 200 );
response . end ( "Hello World!" );
}
var www = http . createServer ( handleRequest );
www . listen ( 8080 );
建立 Dockfile
1
2
3
4
FROM node : 6.9.2
EXPOSE 8080
COPY server . js .
CMD node server . js
Build image & push image
1
2
docker build - t gcr . io / PROJECT_ID / hello - node : v1 .
docker push gcr . io / PROJECT_ID / hello - node : v1
Create clusters
1
2
3
4
5
gcloud config set project PROJECT_ID
gcloud container clusters create hello - world \
-- num - nodes 2 \
-- machine - type n1 - standard - 1 \
-- zone us - central1 - a
Create your pod
Run Kubernetes
1
2
3
kubectl run hello - node \
-- image = gcr . io / PROJECT_ID / hello - node : v1 \
-- port = 8080
kubectl info
1
2
kubectl cluster - info
kubectl config view
troubleshooting
1
2
kubectl get events
kubectl logs < pod - name >
Allow external traffic
1
kubectl expose deployment hello - node -- type = "LoadBalancer"
CLUSTER-IP is the internal IP that is only visible inside your cloud virtual networkEXTERNAL-IP is the external load-balanced IP.
1
2
3
4
5
6
kubectl get services
// NAME TYPE CLUSTER-IP EXTERNAL-IP PORT(S) AGE
// hello-node LoadBalancer 10.31.250.28 35.193.18.36 8080:32123/TCP 90s
// kubernetes ClusterIP 10.31.240.1 <none> 443/TCP 14m
curl http : //<EXTERNAL_IP>:8080
Scale up your service
1
2
3
4
5
6
7
8
9
kubectl get deployment
// NAME DESIRED CURRENT UP-TO-DATE AVAILABLE AGE
// hello-node 1 1 1 1 8m35s
kubectl scale deployment hello - node -- replicas = 4
kubectl get deployment
// NAME DESIRED CURRENT UP-TO-DATE AVAILABLE AGE
// hello-node 4 4 4 4 8m45s
1
2
3
4
5
6
kubectl get pods
// NAME                          READY   STATUS    RESTARTS   AGE
// hello-node-85558f76d7-5cm57   1/1     Running   0          52s
// hello-node-85558f76d7-fqrfs   1/1     Running   0          52s
// hello-node-85558f76d7-gh6r7   1/1     Running   0          52s
// hello-node-85558f76d7-n8dg7   1/1     Running   0          9m34s
Roll out an upgrade to your service
Edit server.js
1
2
3
4
5
6
7
var http = require ( ' http ' );
var handleRequest = function ( request , response ) {
response . writeHead ( 200 );
response . end ( "Hello Kubernetes World!" );
}
var www = http . createServer ( handleRequest );
www . listen ( 8080 );
1
2
docker build - t gcr . io / PROJECT_ID / hello - node : v2 .
docker push gcr . io / PROJECT_ID / hello - node : v2
更改 deployment
1
2
3
kubectl edit deployment hello - node
// gcr.io/PROJECT_ID/hello-node:v1 to gcr.io/PROJECT_ID/hello-node:v2.
更改完後 pod 也會自動重新跑新的 image
重新 curl http://<EXTERNAL_IP>:8080 會發現字就變了
Kubernetes in the Google Cloud Example
1
2
3
4
5
6
7
8
9
10
11
12
13
kubectl run nginx -- image = nginx : 1.10.0
kubectl get pods
// NAME READY STATUS RESTARTS AGE
// nginx-5fc69dfb5d-sql2p 1/1 Running 0 26s
kubectl get deployments
// Kubernetes has created a deployment
// NAME DESIRED CURRENT UP-TO-DATE AVAILABLE AGE
// nginx 1 1 1 1 40s
kubectl get services
// NAME TYPE CLUSTER-IP EXTERNAL-IP PORT(S) AGE
// kubernetes ClusterIP 10.7.240.1 <none> 443/TCP 2m40s
Expose it outside use loadbalancer
1
2
3
4
5
kubectl expose deployment nginx -- port 80 -- type LoadBalancer
kubectl get services
// NAME TYPE CLUSTER-IP EXTERNAL-IP PORT(S) AGE
// kubernetes ClusterIP 10.7.240.1 <none> 443/TCP 5m46s
// nginx LoadBalancer 10.7.254.135 35.225.252.109 80:30560/TCP 76s
Curl
curl http://35.225.252.109:80
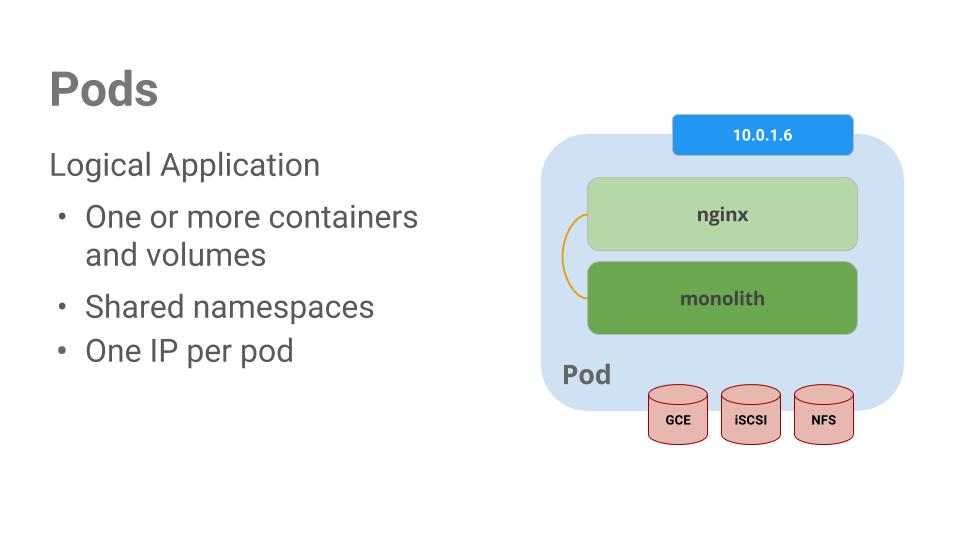
Pods
Logical Application
One or More containers and volumes
Shared namespaces
One IP per pod
pods/monolith.yaml
1
2
3
4
5
6
7
8
9
10
// create pod
kubectl create - f pods / monolith . yaml
kubectl get pods
// NAME READY STATUS RESTARTS AGE
// monolith 1/1 Running 0 58s
// nginx-5fc69dfb5d-sql2p 1/1 Running 0 10m
// get more detail with pod
kubectl describe pods monolith
Interacting with Pods
1
2
3
4
5
6
7
8
9
10
// local 10080 to pod 80
kubectl port - forward monolith 10080 : 80
// with secure api,password "password"
TOKEN = $ ( curl http : //127.0.0.1:10080/login -u user|jq -r '.token')
curl - H "Authorization: Bearer $TOKEN" http : //127.0.0.1:10080/secure
// log
kubectl logs monolith
kubectl logs - f monolith
Curl
curl http://127.0.0.1:10080
Run an interactive shell
1
2
3
kubectl exec monolith -- stdin -- tty - c monolith / bin / sh
ping - c 3 google . com
exit
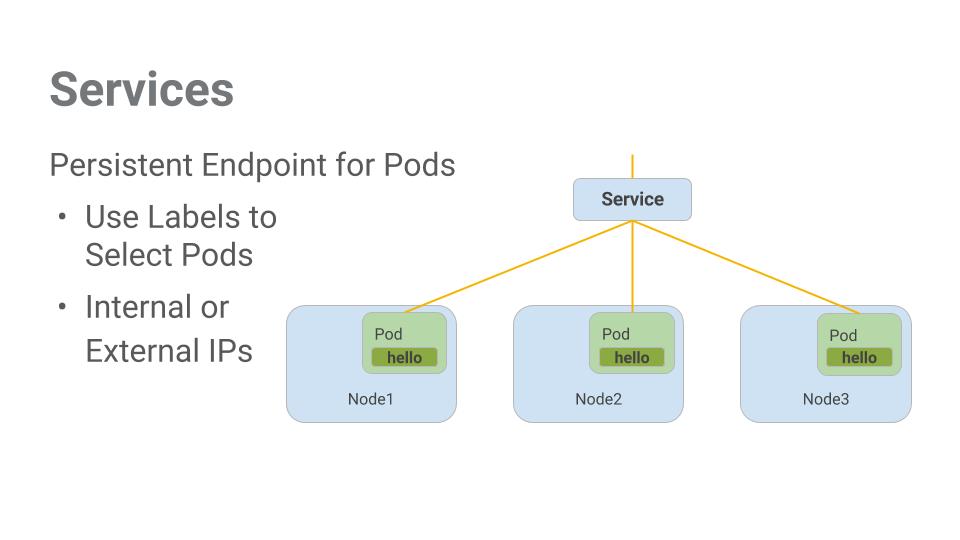
Services
Persistent Endpoint for pods
Uses labels to select pod
Internal or External IPs
Type
ClusterIP (internal) – the default type means that this Service is only visible inside of the cluster,NodePort gives each node in the cluster an externally accessible IPLoadBalancer adds a load balancer from the cloud provider which forwards traffic from the service to Nodes within it.
pods/secure-monolith.yaml
create pod
1
2
3
4
5
6
7
8
9
kubectl create secret generic tls - certs -- from - file tls /
kubectl create configmap nginx - proxy - conf -- from - file nginx / proxy . conf
kubectl create - f pods / secure - monolith . yaml
kubectl get pods
// NAME READY STATUS RESTARTS AGE
// monolith 1/1 Running 0 20m
// nginx-5fc69dfb5d-sql2p 1/1 Running 0 29m
// secure-monolith 2/2 Running 0 20s
Explore the monolith service
services/monolith.yaml
create service
1
2
3
4
5
6
kubectl create - f services / monolith . yaml
kubectl get services
// NAME TYPE CLUSTER-IP EXTERNAL-IP PORT(S) AGE
// kubernetes ClusterIP 10.7.240.1 <none> 443/TCP 34m
// monolith NodePort 10.7.247.31 <none> 443:31000/TCP 8s
// nginx LoadBalancer 10.7.254.135 35.225.252.109 80:30560/TCP 30m
but now can’t access because not have labels
1
2
3
4
5
6
7
8
9
10
11
12
13
14
15
kubectl describe services monolith
// Name:                     monolith
// Namespace:                default
// Labels:                   <none>
// Annotations:              <none>
// Selector:                 app=monolith,secure=enabled
// Type:                     NodePort
// IP:                       10.7.247.31
// Port:                     <unset>  443/TCP
// TargetPort:               443/TCP
// NodePort:                 <unset>  31000/TCP
// Endpoints:                <none>
// Session Affinity:         None
// External Traffic Policy:  Cluster
// Events:                   <none>
Adding Labels to Pods
1
2
3
4
5
6
7
8
9
10
11
12
13
14
// show label app=monolith pods
kubectl get pods - l "app=monolith"
// NAME READY STATUS RESTARTS AGE
// monolith 1/1 Running 0 29m
// secure-monolith 2/2 Running 0 9m38s
// show label app=monolith & secure=enabled pods
kubectl get pods - l "app=monolith,secure=enabled"
kubectl get pods -- show - labels
// NAME READY STATUS RESTARTS AGE LABELS
// monolith 1/1 Running 0 31m app=monolith
// nginx-5fc69dfb5d-sql2p 1/1 Running 0 41m pod-template-hash=5fc69dfb5d,run=nginx
// secure-monolith 2/2 Running 0 12m app=monolith,secure=enabled
get Endpoints
1
2
3
kubectl describe services monolith | grep Endpoints
gcloud compute instances list
curl - k https : //<EXTERNAL_IP>:31000
Deployments
Drive current state towards desired state
orchestrate-with-kubernetes/kubernetes/deployments/
1
2
3
4
5
6
7
8
9
10
11
12
kubectl create - f deployments / auth . yaml
kubectl create - f services / auth . yaml
kubectl create - f deployments / hello . yaml
kubectl create - f services / hello . yaml
kubectl create configmap nginx - frontend - conf -- from - file = nginx / frontend . conf
kubectl create - f deployments / frontend . yaml
kubectl create - f services / frontend . yaml
kubectl get services frontend
curl - k https : //<EXTERNAL-IP>
Tool Config setting
Configure Access to Multiple Clusters - Kubernetes
1
export KUBECONFIG = $ HOME / . kube / config : $ HOME / . kube / staging - 1 a : $ HOME / . kube / staging - 1 b : $ HOME / . kube / prod - 1 a : $ HOME / . kube / prod - 1 b
change kube staging, production
try connect
namespace
1
2
kubectl get pods -- namespace search
kubectl get pods -- n search
current namespace
1
kubectl config view | grep namespace :
entry another namespace pod
1
kubectl - n search exec - it [ pod name ] sh
entry container
1
kubectl exec - it [ pod name ] sh
參考文件