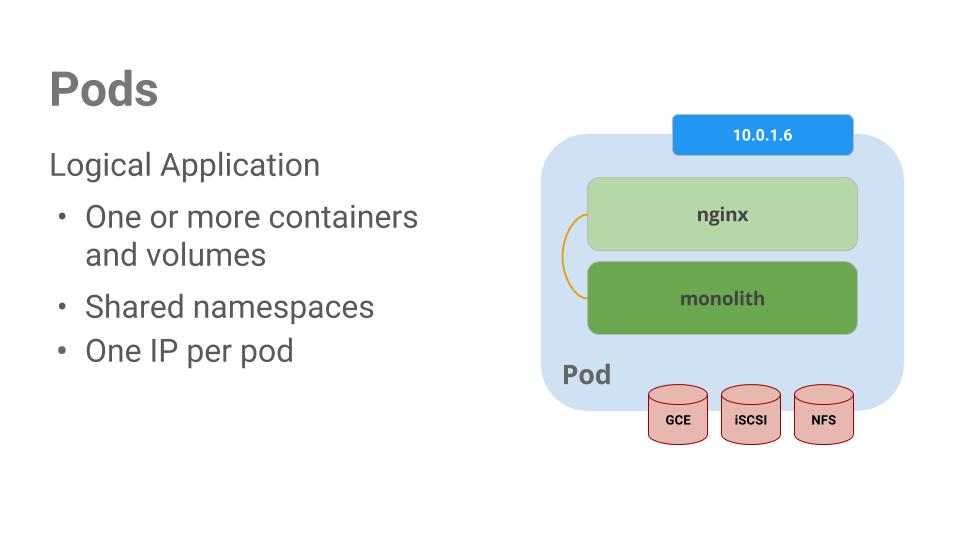
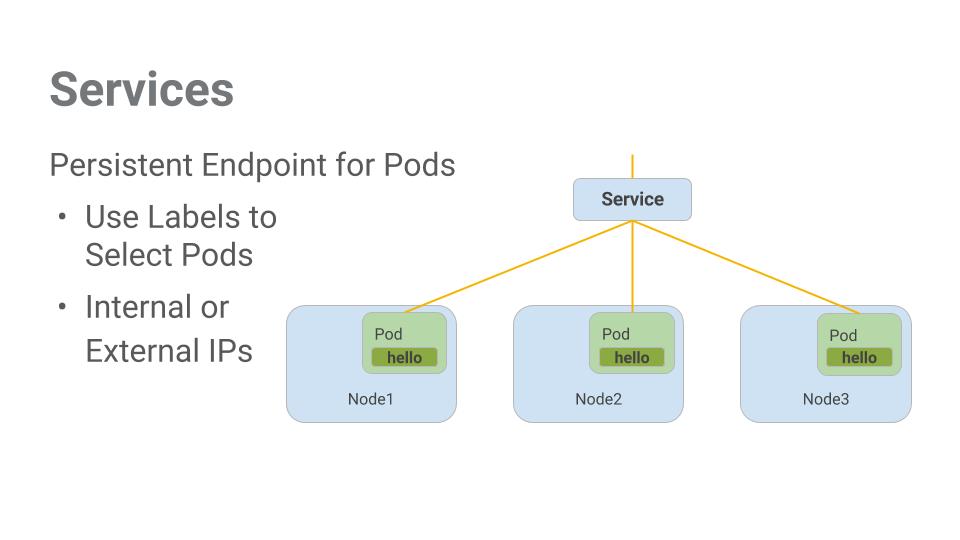
有時候會希望一個 block 東西都執行完,在執行下一個,如果是 db 的話可以用 樂觀鎖 與 悲觀鎖 Optimistic Locking & Pessimistic Locking,避免搶資源問題
但如果是像要發兩個 request 就可以使用 Mutex
,但要小心不要 deadlock (同時使用兩個,A 等待 B, B 等待 A),可以搭配 ConditionVariable
,讓它等待另一個 signal 之後再繼續執行
Mutex implements a simple semaphore that can be used to coordinate access to shared data from multiple concurrent threads.
1 2 3 4 5 6 7 8 9 10 11 12 13 |
|
點一下 button 就能夠複製的功能
1 2 |
|
1 2 3 4 5 6 7 8 9 10 11 |
|
Reference:
]]>當需要產生報表時,可能就需要像是這種套件去產生,目前使用到的是 spreadsheet 也有另一套星星數比較多的 axlsx 感覺比較多功能?
1 2 3 4 5 6 7 8 9 10 11 12 13 14 15 16 17 18 19 20 21 22 23 24 25 26 27 28 29 30 31 32 33 34 35 36 37 38 39 40 41 42 43 44 45 46 47 48 49 50 51 52 53 54 55 56 57 58 59 60 61 62 63 64 65 66 67 68 69 70 71 72 73 74 75 76 77 78 79 80 81 82 83 84 85 86 87 88 89 90 91 92 93 94 95 96 97 98 99 100 101 102 103 104 105 106 107 108 109 110 111 112 113 114 115 116 117 118 119 120 121 122 123 124 125 126 127 128 129 130 131 132 133 134 135 136 137 138 139 140 141 142 143 144 145 146 147 148 149 150 151 152 153 154 155 156 157 158 159 160 161 162 163 164 165 166 167 168 169 170 171 172 173 174 175 |
|
1 2 3 4 5 6 7 8 9 10 11 12 13 14 15 16 17 18 19 20 21 22 23 24 25 26 27 28 29 30 31 32 33 34 35 36 37 38 39 40 41 42 43 44 45 46 47 48 49 50 51 52 53 54 55 56 57 58 59 |
|
1 2 3 4 5 6 |
|
Reference:
]]>除了常見的 travis-ci circleci github 也出了自己的 github actions,比較特別的是,針對這些 action 還出了一個 github action marketplace,可以直接拿別人寫好的 action 就可以使用!蠻方便的
以下為 rails + mysql rspec 範例
1 2 3 4 5 6 7 8 9 10 11 12 13 14 15 16 17 18 19 20 21 22 23 24 25 26 27 28 29 30 31 32 33 34 35 36 37 38 39 40 41 42 43 44 45 46 47 48 49 50 51 52 53 54 55 56 57 58 59 60 61 62 63 64 65 66 67 68 69 70 71 72 |
|
Reference:
]]>刪除 db
1
|
|
顯示 db
1
|
|
進去 db
1
|
|
顯示 collections
1
|
|
查詢
1
|
|
備份 db
1 2 3 4 5 6 |
|
還原 db
1 2 3 4 5 6 7 8 |
|
1 2 3 |
|
快速刪除
1 2 3 4 5 6 7 8 9 |
|
Reference:
]]>前端的時間會根據 GMT 時間,減掉後再帶回後端,因此當前端選擇用 /
去 parse 時間,會出現時間不會加上時區的時間,因此在減掉時區的時間後,反而帶到後端的時間會變成前一天
1 2 3 4 5 |
|
1 2 3 4 5 |
|
1 2 3 4 5 |
|
可以看到只有 new Date('1979/08/01')
帶到後端的時候變成 1979-07-31T15:00:00.000Z
,後端存日期就會錯誤,因此如果前端用 /
,必須將 timezoneOffset 加回來
可以使用套件
1
|
|
1
|
|
有發現上面的 1979-08-01
後面的時間會是 +9
?? 台灣不是 +8
嗎??
點連結發現其實台灣以前也有夏令時間,因此只要日期是那個時間內,就會是 +9
,所以記得 utcOffset()
and getTimezoneOffset
記得要用當下的時間去取得
1 2 3 4 5 6 7 8 |
|
所以正確應該是要
1 2 |
|
1 2 3 4 5 |
|
或是後端吃 string 的話
1
|
|
或是最好就是用標準時間
1 2 |
|
在 javascript 中,時間是非常神奇的東西呢! 剛好遇到時區的相關問題,就來記錄一下
在 js
使用 -
會被 Chrome 解析為格林威治標準時間(GMT)的日期,所以像台灣的「本地時間」是 GMT+8 因此顯示時間會自動加上八小時來顯示。
若使用 /
則會是顯示「本地時間」
當想用 「本地時間」 時,請記得要改用 /
1 2 3 4 5 6 7 |
|
如果拿到的 date 是 2019-08-14T00:00:00.000Z
,則可以透過轉換,來達成不被時區影響
1 2 3 |
|
在 ECMAScript® Language Specification Date Time String Format 有定義一套標準格式,基於 ISO 8601
1 2 |
|
也可以只有日期 (但就是會跟著時區跑)
1 2 3 |
|
結論就是需要跟著時區用 -
,不需要則用 /
除了 vim 之外,也很常聽到的 tmux,搭配起來,效率 up up
1
|
|
更改 prefix ctrl+b
to ctrl+a
,建立 tmux.conf
1 2 3 4 |
|
tmux
: 預設 name 是數字tmux new -s <name>
: 建立新的 session with 新的名稱 (加上 -d
直接進入 detached mode)tmux ls
: 列出目前有的 sessiontmux at
: attatch 到 detached 的 sessiontmux a -t <name>
: attatch 到指定的 sessiontmux kill-session -t <name>
移除指定的 sessiontmux rename-session -t <name> <new_name>
: 更改 session 名稱tmux kill-session -t <name>
: 刪除 session<prefix> + d
: detached<prefix> + a
: attatch<prefix> + "
: 水平分割<prefix> + %
: 垂直分割<prefix> + x
: 關閉 pane<prefix> + <方向鍵>
: 移至其他 pane<prefix> + <Space>
: 切換佈局<prefix> + c
: 建立新的 window (* 表示目前的 window)<prefix> + n
: 移動至下一個 window<prefix> + p
: 移動至上一個 window<prefix> + s
: 列出目前有的 session 並可選擇<prefix> + w
: 列出目前有的 window 並可選擇<prefix> + [
: 移動畫面<prefix> + :set -g mouse on
: 滑鼠捲動最近常在遠端使用,逼得一定要用 vim,也趁這個機會來讓自己對 vim 熟一點~
1
|
|
1 2 3 4 5 6 |
|
1 2 3 4 |
|
1
|
|
1 2 3 4 5 |
|
1 2 3 |
|
1
|
|
1 2 |
|
1 2 3 4 |
|
1 2 3 4 5 6 |
|
1
|
|
1 2 3 4 |
|
1 2 3 |
|
安裝
新增一個 ~/.vimrc
1 2 3 4 5 6 7 8 9 10 11 12 13 14 15 16 17 18 19 20 21 22 23 24 25 26 27 28 29 30 31 |
|
localStorage
只能存 string
1 2 3 4 |
|
如果要存 array
, object
必須先轉成 string
1 2 3 4 5 6 |
|
1 2 3 4 5 6 7 8 9 10 11 |
|
The Location interface represents the location (URL) of the object it is linked to
1 2 3 4 5 |
|
The Window interface represents a window containing a DOM document
1 2 3 4 |
|
1 2 3 4 5 |
|
1 2 3 |
|
1 2 |
|
透過 mapping 屬性名稱,給予賦值
In Object
1 2 3 4 5 6 7 8 9 10 |
|
In function arguments
1 2 3 4 5 6 7 8 9 |
|
In Array
1 2 3 4 |
|
Object
解構是以名稱做對應,Array
則是以順序為對應
1 2 3 4 5 |
|
解構用於提取 json 值時,非常方便
1 2 3 4 5 6 7 8 9 10 11 12 |
|
1 2 3 4 5 6 7 8 |
|
1 2 3 4 5 |
|
1 2 3 4 |
|
Asynchronous(異步/非同步) vs. Synchronous(同步)
Asynchronous
: 不需等待,可以繼續做別的事Synchronous
: 必須等待事情完成,才能繼續做別的事1 2 3 4 5 6 7 8 9 10 |
|
透過 callback function
可以當 response 回來時,在執行
1 2 3 4 5 6 7 8 9 10 11 12 13 14 15 16 17 18 19 20 21 22 23 |
|
簡單的來說,Promise
主要用來處理非同步狀態(async), 就是承諾當任務完成時,通知下一個任務可以開始,不會像上面一樣要一直寫 callback
導致一些 callback hell
Promise 的生命週期
pending
- 等待中的初始狀態fulfillment
- 完成rejecttion
- 失敗1 2 3 4 5 6 7 8 9 10 11 12 13 14 15 16 17 18 19 20 21 22 23 24 25 26 27 28 29 30 31 32 |
|
用 catch
取代 error handler err => {}
1 2 3 4 5 6 7 8 9 10 11 12 13 14 15 16 17 18 19 20 21 22 23 24 25 26 27 28 29 30 31 32 |
|
也有一些非同步模式的變體可以使用
Promise.all
: 等所有都完成再進行下一步Promise.race
: 只要一個先完成就進行下一步fetch
會回傳 promise object
,因此也可以用 then
去接
1 2 3 4 5 6 7 8 9 10 11 12 13 14 15 16 |
|
async function
也會回傳 Promise 的函式
async
: 定義一個 function
為 async
await
: 等待某一 function
return 後再繼續執行,必須包在 async
裡面1 2 |
|
1 2 3 4 5 6 7 8 9 10 11 12 |
|
1 2 3 4 5 6 7 8 9 10 11 12 13 14 15 16 17 18 19 |
|
1 2 3 4 5 |
|
可立刻執行的函示,好處不會污染到 global,在函示後面加上 ()
即可
1 2 3 4 5 6 |
|
ES6 新增的寫法
1 2 3 4 5 6 7 8 9 10 11 12 |
|
Arrow Function don’t bind arguments
1 2 3 4 5 6 7 8 9 10 11 12 13 14 15 16 17 18 19 20 |
|
Arrow Function don’t bind this
因為 arrow function
沒有綁定 this
因此會 undefined
1 2 3 4 5 6 7 8 9 10 11 12 13 14 15 16 17 18 19 20 21 22 23 24 25 26 |
|
1 2 3 4 5 6 7 8 9 10 11 12 13 14 15 16 17 18 19 20 21 22 23 24 25 26 27 28 29 30 31 32 33 34 35 36 37 38 39 40 41 42 43 44 |
|
constructor 的用法就是 function
搭配 new
關鍵字:
可以透過 Constructor function
達成 Object-oriented programming (OOP)
,就像是 class
那樣
1 2 3 4 5 6 7 8 9 |
|
new
建立新的 instance{}
)Person
)1 2 |
|
Person.prototype
1 2 |
|
這裡的 this
就是 Person
後來出的新語法 class
,讓原本的 function
寫法更乾淨,更像 OOP 一點
1 2 3 4 5 6 7 8 9 10 11 12 13 14 15 16 17 18 19 20 21 22 23 24 25 26 27 28 29 30 31 |
|
可以在建立一個 class,去繼承其他的 class
1 2 3 4 5 6 7 8 9 10 11 12 13 14 15 16 17 18 19 20 21 22 23 24 |
|
get
syntax binds an object property to a function that will be called when that property is looked up.set
syntax binds an object property to a function to be called when there is an attempt to set that property.執行時,就跟變數一樣,不需加上 ()
1 2 3 4 5 6 7 8 9 10 11 12 13 14 15 |
|
this 是 function 執行時所屬的物件,而 this 是在執行時期做繫結,其值和函式在哪裡被呼叫(call-site)有關。
1 2 3 4 5 6 7 8 9 10 11 12 13 14 15 16 17 18 19 |
|
匹配的優先順序由高至低排列
this
會指向 new
出來的物件。
new foo()
sets this
to a brand new empty object.call
、apply
、bind
,明確指出要繫結給 this
的物件。
foo.call(obj2)
sets this
to the obj2
object.this
就會被繫結至該物件。
obj1.foo()
sets this
to the obj1
object.call
、apply
、bind
或不屬於任何物件的 method,就套用預設繫結,在非嚴格模式下,瀏覽器環境 this
的值就是預設值全域物件 window,而在嚴格模式下,this
的值就是 undefined
。1 2 3 4 5 6 7 8 9 10 11 |
|
1 2 3 4 5 6 7 8 9 10 11 12 |
|
A closure is the combination of a function and the lexical environment within which that function was declared.
閉包 (Closure) 是一種特殊的函式,他能夠存取被宣告當下的環境中的變數。
1 2 3 4 5 6 7 8 |
|
1 2 3 4 5 6 7 8 9 10 11 12 |
|
1 2 3 4 5 6 7 8 9 10 11 |
|
1 2 3 4 5 6 7 8 9 |
|
output 出相同的值,因為 function 裡的 object 是 reference 到同一個 memory,
1 2 3 4 5 6 7 8 9 10 11 |
|
但是當 assign 一個新的 object 給 account,就會是不一樣的 object
1 2 3 4 5 6 7 8 9 10 11 12 13 14 |
|
1 2 3 4 5 6 7 8 9 10 |
|
String methods
1 2 3 4 5 6 7 |
|
Number & Math methods
1 2 3 4 5 6 7 8 9 10 |
|
Prototype 可說是物件的一種 fallback 機制,當在此物件找不到指定屬性時,就會透過原型鏈結(prototype link / prototype reference)追溯到其父物件上。
透過 prototype
可以 shared 給每個 instance
,因為 instance
都是繼承自 prototype property
以下 new
出來的 instance 都繼承自 Person prototype
1 2 3 4 5 6 7 8 9 10 11 12 13 14 15 16 17 18 19 20 21 22 23 24 25 26 27 28 |
|
所有 object 都有 hasOwnProperty
是因爲都繼承自 Object.prototype
1 2 3 4 5 6 7 |
|
基本型別 Primitives values 的 prototype
string
, number
, boolean
, undefined
, null
1 2 3 4 5 |
|
1 2 3 4 5 6 7 8 9 10 11 12 13 14 15 16 17 |
|
1 2 3 4 5 6 7 8 9 10 |
|
1 2 3 4 5 6 7 8 9 |
|
for object should use findIndex
1 2 3 4 5 6 7 8 9 10 11 12 13 14 15 16 17 18 |
|
1 2 3 4 5 6 7 8 9 10 11 12 13 14 15 16 17 18 19 20 21 |
|
1 2 3 4 5 6 |
|
1 2 3 4 5 6 7 8 9 10 11 12 13 14 15 16 17 18 19 20 |
|
1 2 3 4 5 6 7 8 9 |
|
1 2 3 4 5 6 7 8 9 10 11 12 13 14 15 16 17 18 19 20 21 22 23 24 25 26 27 |
|
1 2 3 4 5 6 |
|
1 2 3 4 5 6 |
|
1 2 3 4 5 6 7 8 9 10 11 |
|
1 2 3 4 5 6 7 |
|
以下 6 個為 Falsy
其他都是 Truthy
1 2 3 4 5 6 7 |
|
1 2 3 4 5 6 7 8 |
|
可以用 !!
來做確認
1 2 3 4 5 6 |
|
===
:不做轉型,因此型別對比較是有影響的。==
:會強制轉型
valueOf()
或 toString()
將物件取得基本型別的值,再做比較1 2 3 4 5 6 7 8 9 10 11 12 13 14 15 16 17 18 19 20 21 |
|
1 2 3 4 5 6 |
|
1 2 3 4 5 6 7 8 9 10 11 |
|
1 2 3 4 5 6 7 |
|
break
- 如果不加的話會繼續執行下去default
- 如果上面都沒有執行,就會執行這行1 2 3 4 5 6 7 8 9 10 11 12 13 |
|
1 2 3 4 5 6 7 |
|
1 2 3 4 5 6 7 8 |
|
1 2 3 4 5 6 7 |
|
1 2 3 4 5 6 7 8 9 |
|
1 2 3 4 5 6 |
|
將運算元轉乘 32 位元的 0 和 1,&
兩個都是 1 就是 1,|
一個是 1 才是 1,最後在轉換成數字
1 2 3 4 5 6 7 8 9 10 11 |
|
try..catch
: 捕獲 error
,嘗試做其他處理throw
: 拋出 error
1 2 3 4 5 6 7 8 9 10 11 12 13 |
|
A JavaScript identifier must start with a letter, underscore (_), or dollar sign ($) subsequent characters can also be digits (0-9). Because JavaScript is case sensitive, letters include the characters “A” through “Z” (uppercase) and the characters “a” through “z” (lowercase).
From MDN Variables
在變數命名時,要注意不要跟這些字一樣
var
function scope
)let
(ES6)
block scope
)const
(ES6)
block scope
)是const
主要用於常數,像是圓面積的 π
const PI = 3.14
因此 var
在 function
不會被外部讀取到,但在 if
, else
, for
, while
等等區塊語句宣告時,則會變成 global variable
,導致一些無法預期的事發生,如果希望都以區塊當範圍,則改用 let
當使用 let
和 const
時,不可以重複宣告一樣的變數名稱 (var
可以覆蓋,所以建議改用 let
和 const
)
1 2 3 |
|
1 2 3 4 5 |
|
1 2 3 4 5 6 7 8 9 10 11 12 |
|
1 2 3 4 5 6 |
|
原因在於 var
宣告後,會變成 global variable
而變成以下
1 2 3 4 5 6 |
|
解法改用 let
或是 IIFE 立即函示 (Immediately Invoked Function Expression)
1 2 3 4 5 6 7 |
|
1 2 3 4 5 6 7 8 9 |
|
1 2 3 |
|
使用 ` 包起來,裡面的變數則用 ${}
1
|
|
1 2 3 4 5 6 7 8 |
|
兩邊的值資料型別不同,當其中一方是字串時,+
所代表的就是字串運算子,而將數字強制轉型為字串
1 2 3 |
|
透過 Number()
先將字串轉為數字即可
1 2 3 |
|
Global Scope 全域變數
- 在 function scope(var)
和 block scope(let, const)
之外宣告的變數,全域變數在整個程式中都可以被存取與修改。Local Scope 區域變數
- 在 function scope(var)
和 block scope(let, const)
內宣告,每次執行函式時,就會建立區域變數再予以摧毀,而且函式之外的所有程式碼都不能存取這個變數。1 2 3 4 5 6 7 8 9 10 11 12 |
|
指在某變數可視範圍內,定義了同名變數,在後者的可視範圍中,取用同一名稱時所用的是後者的定義。
1 2 3 4 5 6 7 8 9 10 |
|
當沒有用 var
let
const
宣告時,要取得 global variable 時,找不到會自動 create 一個
1 2 3 4 5 6 7 8 9 |
|
1 2 3 4 5 6 7 8 9 10 |
|
在程式執行前,編譯器(compiler)會先由上到下逐行將程式碼轉為電腦可懂的命令,然後再執行編譯後的指令。在這個編譯的階段,編譯器找出所有的變數並繫結所屬範疇,但不賦值,所以此刻變數所帶的值是 undefined;而在執行階段,JavaScript 引擎才會處理給值的事情。
1 2 3 4 5 6 7 8 |
|
相當於底下,x 編譯時先被提升到上面
1 2 3 4 5 6 7 8 9 |
|
改成用 let
就會出現 error
1 2 3 4 5 6 7 8 |
|
undefine
- 當宣告變數但沒給值,default argument
,或是沒 return 值時,就會是 undefine
,也可以像一般值一樣 assign1 2 3 4 5 6 7 8 9 10 11 |
|
null
- 可以像一般值一樣 assign,或是像 match
沒有和匹配時,就會是 null
1 2 3 4 5 |
|
1 2 3 4 5 6 7 8 9 |
|
typeof
1 2 3 4 5 6 |
|
因為 js 會強制轉型,不會 error 導致會發生一些無法預期的行為
1 2 3 4 5 6 7 |
|
預防開發者的一些不小心或錯誤的行為,JavaScript 引擎協助做了一些檢測的工作(防止像 Leaked global
)
未宣告變數而賦值的狀況下,會無預警的產生一個全域變數,使用 Strict Mode 則會禁止
1 2 3 |
|
1 2 3 4 5 6 7 |
|
之前一直沒有特別研究什麼事 Function Programming
,這次就好好的來研究一下
函式式程式設計 Functional Programming (FP)
是 程式設計 programming paradigm
的其中一種,是一類典型的程式設計風格,其他像是 物件導向程式設計 Object-oriented programming (OOP)
也是其中一種。
不同的程式設計,有不同的設計概念,因此用來解決問題的思考
方式也大不相同,所以必須先瞭解這些語言的理念,才有辦法對症下藥。
必須符合以下的一項或多項重要概念(最重要的屬於前兩項)
函式就算定義為「高階函式」,也不一定就能稱為「函式程式設計」,符合函式程式設計有一定的要件,你還必須確保該函式要能「避免改變狀態」、「避免可變的資料」以及擁有「純函式」等特性。
對待函式(Function) 如同對待其他資料型別一樣,例如可以像變數一樣 直接賦予值
或是 當作參數傳遞
(javascript
就屬於此特性)
1 2 3 4 5 6 7 |
|
至少會滿足下列其中一項條件
1 2 3 4 5 |
|
1 2 3 4 5 6 7 8 |
|
意指將相同的傳入 (Input)丟入函式,永遠會回傳相同的 output 結果,而且在過程中完全沒有任何的副作用。
意指函式在執行的時候,完全相同的參數傳入 (Input),永遠會回傳相同的傳出 (Output),而且在過程中完全沒有任何副作用
,且函式程式設計更加強調「執行的結果」而非「執行的過程」,倡導利用幾個簡單的函式來計算結果,
副作用包括像是
1 2 3 4 5 6 7 8 9 |
|
可以發現到,slice()
每次 output 都會是一樣,而 splice()
則會不同
函式程式設計 Functional Programming
屬於 宣告式程式設計 Declarative Paradigm
的一種
1 2 3 4 5 6 7 8 9 10 11 12 |
|
1 2 3 4 5 6 |
|
js 裡的 fliter
map
和 reduce
屬於高階函式
之前接觸的大多是 Object-oriented programming (OOP)
透過這次更加了解 Functional Programming (FP)
,不然之前都以為 javascript
== Functional Programming
,原來指的不是語言,而是設計風格啊~
1 2 3 4 5 6 7 8 9 10 11 12 13 14 15 16 17 |
|
https://play.golang.org/p/Zpbiau9RuGm
1 2 3 4 5 6 7 8 9 10 11 12 13 14 15 16 17 18 19 20 21 22 23 24 25 26 27 |
|
https://play.golang.org/p/ocNj5lp0W0_4
解決方式,改用 index 的方式
for i := 0; i < len(stus); i++ {
m[stus[i].Name] = &stus[i]
}
for k, v := range m {
fmt.Println(k, "=>", v.Name)
}
for i, _ := range stus {
m[stus[i].Name] = &stus[i]
}
for k, v := range m {
fmt.Println(k, "=>", v.Name)
}
1 2 3 4 5 6 7 8 9 10 11 12 13 14 15 16 17 18 19 20 21 22 23 24 25 26 |
|
https://play.golang.org/p/EzCWf8r1wnt
1 2 3 4 5 6 7 8 9 10 11 12 13 14 15 16 17 18 19 20 21 22 23 24 25 26 27 28 |
|
https://play.golang.org/p/eSGvASIBn5K
anonymous struct field
,就會被當成 promoted fields
,簡單的來說原本 people 的方法(必須是匿名)就可以直接被 teacher 給調用1 2 3 4 5 6 7 8 9 10 11 12 13 14 15 16 17 18 19 20 |
|
https://play.golang.org/p/ntESh6QYaYT
1 2 3 4 5 6 7 8 9 10 11 12 13 14 15 16 17 18 |
|
https://play.golang.org/p/BrhIs-_chN_y
1 2 3 4 5 6 7 8 9 |
|
https://play.golang.org/p/7VHcPYjenWw
1 2 3 4 5 6 7 8 9 10 11 12 13 14 15 16 17 18 19 20 21 22 23 24 25 26 27 28 29 30 31 32 33 |
|
https://play.golang.org/p/KwtbBryhP5x
fatal error: concurrent map read and map write
go
func (ua *UserAges) Get(name string) int {
ua.Lock()
defer ua.Unlock()
if age, ok := ua.ages[name]; ok {
return age
}
return -1
}
1 2 3 4 5 6 7 8 9 10 11 12 13 14 15 16 17 18 19 20 21 22 23 24 25 26 27 28 29 30 31 32 33 34 35 36 37 |
|
https://play.golang.org/p/2n2GBeo35Jo
go
ch := make(chan interface{},len(set.s))
1 2 3 4 5 6 7 8 9 10 11 12 13 14 15 16 17 18 19 20 21 22 23 24 25 26 |
|
https://play.golang.org/p/u1qbY4CbVNQ
go
var peo People = &Stduent{}
1 2 3 4 5 6 7 8 9 10 11 12 13 14 15 16 17 18 19 20 21 22 23 24 25 26 27 28 |
|
https://play.golang.org/p/2nBU-dMwW6b
1 2 3 4 5 6 7 8 9 10 11 12 13 14 15 16 |
|
https://play.golang.org/p/lx6W61O66P
nil
並不代表 interface 是 nil
var in interface{}
type People interface {
Show()
}
var x interface{}
則為 empty interface
1 2 3 4 5 6 7 8 9 10 11 12 13 14 15 16 17 18 19 20 21 22 23 |
|
https://play.golang.org/p/-OiFMCcYttw
1 2 3 4 5 6 7 8 9 10 11 12 13 |
|
https://play.golang.org/p/nH6KTCel6ns
1 2 3 4 5 6 7 8 9 10 11 12 13 14 15 16 17 18 19 20 21 22 23 24 25 26 27 28 29 30 |
|
https://play.golang.org/p/HpOb3huRV-0
1 2 3 4 5 6 7 8 9 |
|
https://play.golang.org/p/CEwGhsmQfZx
string
=> “”int
, float
=> 0channel
, func
, map
, slice
=> nil
1 2 3 4 5 6 7 8 9 10 |
|
https://play.golang.org/p/xOWsWj0Evni
...
展開 s2...
1 2 3 4 5 6 7 8 9 10 11 12 13 14 15 16 17 18 19 20 21 22 23 24 25 26 27 28 29 30 31 32 33 |
|
https://play.golang.org/p/3cEX9aYtvsR
sn3 := struct {
age int
name string
}{age: 11, name: "qq"}
reflect.DeepEqual
if reflect.DeepEqual(sm1, sm2) {
fmt.Println("sm1 == sm2")
}
1 2 3 4 5 6 7 8 9 10 11 12 13 14 15 16 17 18 19 20 21 |
|
https://play.golang.org/p/noHSLgTvdEq
nil
可以用作 interface
、function
、pointer
、map
、slice
和 channel
的"空值"。1 2 3 4 5 6 7 8 9 10 11 12 13 14 15 |
|
https://play.golang.org/p/XwtR_I0fQdp
1 2 3 4 5 6 7 8 9 10 11 12 |
|
https://play.golang.org/p/AUfpBHZg-F4
:=
是聲明並賦值,並且系統自動推斷類型,必須放在 main function 裡面1 2 3 4 5 6 7 8 9 10 11 |
|
https://play.golang.org/p/dbK6-maWceJ
1 2 3 4 5 6 7 8 9 10 11 12 |
|
https://play.golang.org/p/-0KuesWC3kM
1 2 3 4 5 6 7 8 9 10 11 12 |
|
https://play.golang.org/p/ELp_QFf5-o2
1 2 3 4 5 6 7 8 9 10 11 12 13 14 15 16 17 18 19 20 21 22 23 |
|
https://play.golang.org/p/2fsGAqTmUrH
i2.m1()
會 error,因為 m1() 是 MyUser1
才有的 func,不是 User1 2 3 4 5 6 7 8 9 10 11 12 13 14 15 16 17 18 19 20 21 22 |
|
https://play.golang.org/p/zwvjqUFLHax
ambiguous selector my.m1
),把其中一個拿掉就可以 work,或是改為 my.T1.m1()
+ my.T2.m1()
1 2 3 4 5 6 7 8 9 10 11 12 13 14 15 16 17 |
|
https://play.golang.org/p/CvqxnzGSAG9
1 2 3 4 5 6 7 8 9 10 11 12 13 14 15 16 17 18 19 20 21 22 |
|
https://play.golang.org/p/8RL7gO5_4EF
funx
裡的 i 都是同一個,要不一樣要先 assign 到新的 value
go
for i:=0;i<2 ;i++ {
x:=i
funs = append(funs, func() {
println(&x,x)
})
}
1 2 3 4 5 6 7 8 9 10 11 12 13 14 15 16 17 18 19 20 21 |
|
https://play.golang.org/p/5ReC78kUM3c
minikube 只提供 signle-node Kubernetes Cluster,本身並不支援 HA (High availability) 因此不推薦實際應用上運行
Minikube 是 Kubernetes 輕量化的實作,會在本機的 VM 內建立並且執行一個單一節點的 Kubernetes Cluster。
本機端操作,只有一個 Node 就是 minikube
minikube 會在本機端跑起一個 vm,因此要先安裝 virtualbox
1
|
|
可以透過此工具來部署管理 Kubernetes Install and Set Up kubectl
1 2 |
|
也可以透過 curl 來安裝 kubectl 的 binary 執行檔
1 2 3 4 5 6 7 8 |
|
1
|
|
啟動 minkkube
第一次啟動會自動建立下載映像檔來建立 VM 所以會比較久
1 2 3 4 5 6 7 8 9 10 11 12 13 14 15 16 17 |
|
啟動 minikube 之後,HOME 目錄會多一個 .kube
的資料夾,而 kubectl 就是透過該資料夾底下的 configuration 與 minikube 溝通
1 2 3 4 5 6 7 8 9 10 11 12 13 14 15 16 17 18 19 20 21 |
|
1 2 3 4 5 6 7 8 9 10 11 12 13 14 15 16 17 18 19 20 21 22 23 24 |
|
run
:建立一個 Deployment 或是 Job 來管理被建立的 Container--image
:Image 的來源,這裡是用 gcp 提供的 image--port
:指定埠號expose
:讓存取 hello-minikube 服務可以被存取--port
: container 對應到 pod 的 port1 2 3 4 |
|
1 2 3 4 |
|
default Pod 只允許 cluster 內部訪問,因此透過 expose 將 container 的 port 對應到 Node 的 port
expose
: 把 deployment expose 成對外 service--type=NodePort
: 把 Deployment 透過 Kubernetes Cluster 的 port 讓 Cluster 外部可以訪問service 將 docker-golang-demo
的 8080
port 與 minikube 上的 31754
port 做 mapping
1 2 3 4 5 6 7 |
|
1 2 |
|
1 2 3 4 5 6 7 8 9 10 11 12 13 14 15 16 17 18 19 20 21 22 23 |
|
將 container update 成 v2 版本
1
|
|
或是編輯 deployment 更改成 v2,儲存後會自動 update
1
|
|
打開一樣的網址 http://192.168.99.100:31754
會發現頁面變成 v2 了
將 container rollout 成 v1 版本
1 2 3 4 5 6 7 8 9 10 |
|
1 2 3 4 5 6 |
|
demo-pod.yaml
1 2 3 4 5 6 7 8 9 10 11 12 |
|
apiVersion
: Kubernetes 版本號kind
:說明 Kubernetes Object 是什麼類別metadata
name
: 指定 pod 的名稱labels
: 透過 Label Selector 將Pod分群管理annotations
: 相較於labels,annotations 通常是使用者任意自定義的附加資訊,提供外部進行查詢使用,像是版本號,發佈日期等等spec
container.name
: container 的名稱container.image
: 根據 Docker Registry 提供的可下載路徑container.ports
: 該 container 有哪些 port number 是允許外部資源存取1 2 3 4 5 6 |
|
1 2 3 |
|
Kubernetes Cluster 內部會有一套網路系統,會替每個 Pod 建立一個內部隨機產生的 Cluster IP。這個 Cluster IP 只有Cluster內部資源可以使用;外部資源是無法透過 Cluster IP 與 Pods 互動,所以我們需要再建立一個 Service 元件作為一個橋樑,讓 Cluster 以外的服務也可以與 Pod 做互動。
1 2 3 4 5 6 |
|
取得 url
1 2 |
|
alpine 提供非常輕量級的 Docker Image,藉由 Kubernetes Cluster 中,會給每個 Pod 一個 Cluster IP 且只有在 Cluster 裡才可以存取的特性,透過 alpine 來訪問其他 pod
1 2 3 4 5 6 7 8 |
|
1 2 3 4 5 6 7 8 9 10 11 12 13 14 15 16 17 18 19 20 21 22 23 24 25 26 |
|
管理 containers 橫向擴展(Horizontal scaling),透過增加更多的機器節點,獲取更多資源
1 2 3 4 5 6 7 8 9 10 11 12 13 14 15 16 17 18 |
|
spec.replicas
: pod 副本的數量spec.selector
: 指定選擇 Pod 的條件(labels)spec.template
: 定義pod的資訊,包含Pod的labels以及Pod中要運行的containerspec.template.metadata
: Pod 的 labels,metadata.labels
必須被包含在select中,否則在建立Replication Controller物件時,會發生error。建立小型 server.js
server.js
1 2 3 4 5 6 7 |
|
建立 Dockfile
1 2 3 4 |
|
Build image & push image
1 2 |
|
Create clusters
1 2 3 4 5 |
|
Run Kubernetes
1 2 3 |
|
kubectl info
1 2 |
|
troubleshooting
1 2 |
|
1
|
|
CLUSTER-IP
is the internal IP that is only visible inside your cloud virtual networkEXTERNAL-IP
is the external load-balanced IP.1 2 3 4 5 6 |
|
1 2 3 4 5 6 7 8 9 |
|
1 2 3 4 5 6 |
|
Edit server.js
1 2 3 4 5 6 7 |
|
1 2 |
|
更改 deployment
1 2 3 |
|
更改完後 pod 也會自動重新跑新的 image
1
|
|
重新 curl http://<EXTERNAL_IP>:8080
會發現字就變了
1 2 3 4 5 6 7 8 9 10 11 12 13 |
|
Expose it outside use loadbalancer
1 2 3 4 5 |
|
Curl
curl http://35.225.252.109:80
Logical Application
1 2 3 4 5 6 7 8 9 10 |
|
1 2 3 4 5 6 7 8 9 10 |
|
Curl
curl http://127.0.0.1:10080
1 2 3 |
|
Persistent Endpoint for pods
Type
ClusterIP (internal)
– the default type means that this Service is only visible inside of the cluster,NodePort
gives each node in the cluster an externally accessible IPLoadBalancer
adds a load balancer from the cloud provider which forwards traffic from the service to Nodes within it.create pod
1 2 3 4 5 6 7 8 9 |
|
create service
1 2 3 4 5 6 |
|
but now can’t access because not have labels
1 2 3 4 5 6 7 8 9 10 11 12 13 14 15 |
|
1 2 3 4 5 6 7 8 9 10 11 12 13 14 |
|
get Endpoints
1 2 3 |
|
Drive current state towards desired state
orchestrate-with-kubernetes/kubernetes/deployments/
1 2 3 4 5 6 7 8 9 10 11 12 |
|
Config setting
Configure Access to Multiple Clusters - Kubernetes
1
|
|
1
|
|
try connect
1
|
|
namespace
1 2 |
|
current namespace
1
|
|
entry another namespace pod
1
|
|
entry container
1
|
|
參考文件
]]>龐大且複雜的程式碼
: 除錯、新增功能與測試都包在一起,變得十分複雜容易以低效率的開發方式進行
: 利用新語言和新框架將更為困難,因為搬移或更動將耗費巨大成本不利於敏捷開發
: 現今的服務幾乎是每天更新,單體架構會讓這件事變得很耗時間可靠性低
: 單體架構是將所有的模組均建構在一個程序(process)內,當其中一環有bug時,容易牽一髮動全身協助自動化部署(automating deployment)、自動擴展(scaling)、管理容器應用程式(containerized applications)、指揮調度(Orchestration)
一個 Node 可能有一個或者是多個 Pod
每個 Node 都會執行一個 Container 的 Runtime,主要是拉取 Image 並執行 Container
masters和nodes組成叢集(Clusters)
容器是位於 pod 內部,一個 pod 包覆著一個以上的 Container,這造成 K8S 與一般容器不同的操作概念。在Docker裡,Docker container 是最小單位。
Service 元件作為一個橋樑,讓 Cluster 以外的服務也可以與 Pod 做互動。
Deployments顧名思義掌控了部署Kubernetes服務的一切。它主要掌管了Replica Set的個數,而Replica Set的組成就是一個以上的Pod。
1 2 3 4 5 6 7 8 9 10 11 12 13 14 15 16 |
|
1
|
|
1
|
|
1
|
|
1
|
|
or
1 2 3 4 5 6 |
|
1
|
|
or
1 2 3 |
|
1 2 3 4 5 6 7 8 |
|
1
|
|
1
|
|
1
|
|
1 2 3 4 5 6 7 8 9 10 11 12 |
|
1
|
|